Bench Press Form: Wide Grip vs. Narrow Grip, Arched Back vs. Flat Back
I don’t care if I sound like a broken record: the principles used to create the optimized powerlifting bench press technique in this article were distilled from Mark Rippetoe’s Starting Strength . If you find yourself enjoying this type of analysis, you’ll love Starting Strength. Do yourself a favor and snag a copy of the book.
 .
.
In the foundation article of this series, the concept of moment arms was introduced. The sum total length of all relevant moment arms on the lifter/barbell system equates to the amount of leverage the lifter must overcome to complete the lift. If you’re not aware of what a moment arm is, see Part I.
For lifters with “poor” leverages, 405lbs is not the same 405lbs that is for a lifter with “good” leverages. In fact, the strongest lifter doesn’t always win on a given lift. Sometimes, it is the lifter with the more advantageous body type. And, more importantly, sometimes it is the smarter lifter who knows how to manipulate the leverages of a given lift to his favor. Let’s analyze how we can do that in the bench press.
If you don’t mind missing out on a few of the finer details, the following video summarizes this article well:
https://www.youtube.com/watch?v=GvTzrvtos5I
Balance and The Shoulder Joint
In the squat, the mid-foot is the balance point of the system. Any time you bring the center of mass (CoM) of a system out of line with its balance point, you create an unnecessary moment arm. In much the same way that it requires greater effort to stay afoot when you’re leaning backwards, it takes greater effort to move a weight when it is being moved out of balance.
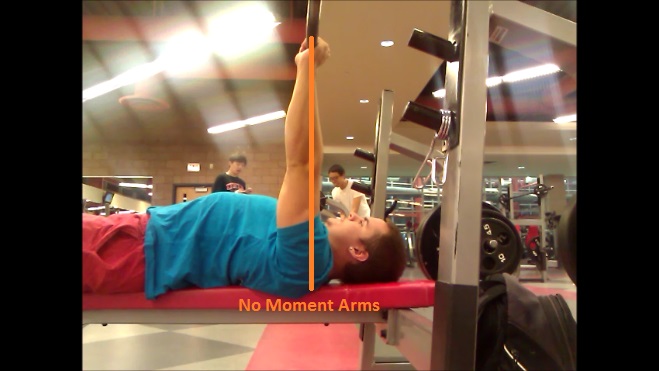
In the bench press, the shoulder joint is this point of balance; the shoulder joint represents the fulcrum of the system. Consider a wrench once more. The bolt is the fulcrum and the wrench handle is the moment arm. And the shorter the handle the less effective the wrench will be. Because our shoulder is that “bolt”, we want to minimize any moment arms in order to improve our leverages.
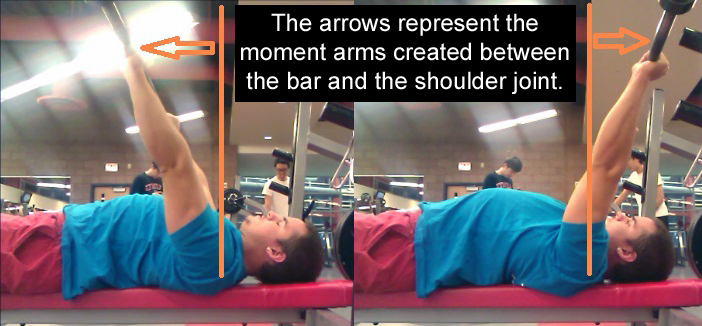
Benching in a Straight Line
Wait a minute; am I essentially advocating a straight line bench? In a perfect world, a straight line bench would be the most mechanically efficient way to press. However, due to the anatomical construction of the vast majority of shoulders, this is impossible.
You see, shoulder joints tend to “impinge” when the elbows travel in a line parallel to the bar. When you reach somewhere around 90 degrees, the bony parts of the shoulder run into rotator cuff. Over time, you can literally saw a hole into your rotator cuffs by benching with your elbows completely flared. This is why the bench press has a reputation for being a shoulder destroyer. Performed incorrectly, the movement can and will cause impingement which, over time, will lead to shoulder degradation.
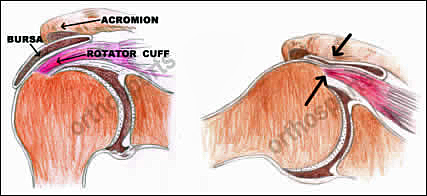 Photograph: orthosports.com
If our career in the sport is to be a long one, and it should be in order to give us the necessary time to maximize our genetic potential, we must preserve the health of our shoulders. This requires benching with a non-vertical bar path. Avoiding Shoulder Impingement in the Bench Press
So, this raises the question. Exactly where should the bar touch on the chest in a bench press designed for optimal powerlifting performance? The answer is remarkably similar to our answer for squat stance width.
As you might expect, there are several common genetic variations when it comes to the shoulder joint. For some, impingement will occur with less shoulder rotation than others. Unfortunately, there is no way to prescribe a specific touch point except on a case by case basis. First and foremost, you must protect your shoulders. In order to do this, you’ll have to experiment to see what you can personally get away with. The closer to the joint, the more mechanically efficient you will be.
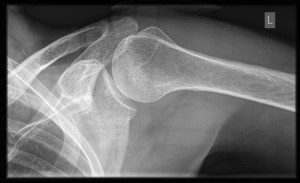 This is your shoulder joint.
This said, there are some ways that everyone can “move” their ideal touch point closer to the shoulder joint itself.
Bench Press Grip Width
Remember, impingement is going to happen at a particular degree of shoulder rotation given a certain amount of shoulder abduction (shoulder abduction is the degree to which the elbows are flared; 90 degrees being completely parallel to the bar). By taking a wider grip, we can decrease the amount of distance the bar has to travel in order to achieve full range of motion.

Look at the yellow arrows pointing to the catches on each upright. The wide grip bench (right) clearly cuts off 2-3″ of RoM compared to the narrower grip.
A wider grip also allows us to get closer to the shoulder before impingement starts to occur. Because the range of motion has been shortened, you’re getting “deeper” with the bar for the same amount of shoulder rotation. What this means in practical terms is that you don’t have to touch as far down your chest as you normally might with a closer grip.
However, I must make a cautionary note. Grip width itself will present shoulder problems for some anatomical variations of the shoulder joint. In this case, the same principles still apply, but the exact grip width must be moderated. Essentially, use the widest grip you can tolerate without pain. In the context of your circumstances, this will still result in the shortest range of motion possible and the touch point that is closest to your shoulder joint.
In sum, the wider grip both significantly decreases the range of motion and shortens the lever arm between the shoulder and the bar. Both of these factors will allow for more weight to be lifted even absent a gain in strength.
The Bench Press Arch
Developing a good arch in your back is one of the most critical components to perfecting your bench press technique.
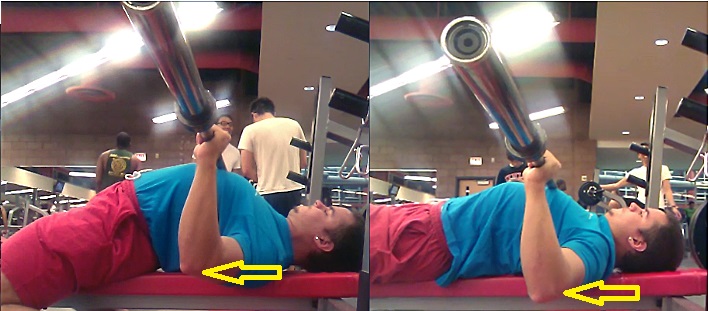 Notice the elbow height relative to the bench pad. When you arch (left), you cut the range of motion another several inches.
First, let’s address the obvious. The arch significantly decreases the range of motion of the movement. In much the same way that you will always quarter squat more than you can squat to depth, you’ll always bench more with an arch versus what you can bench without an arch.
However, the arch also allows for a closer touch point to the shoulder for exactly the same reason that the wider grip does: less range of motion means less degrees of shoulder rotation at a given distance from the chest.

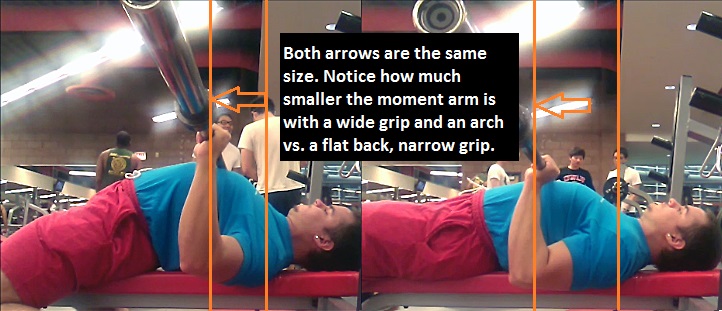
Shoulder impingement happens after a certain degree of shoulder rotation when the bar is traveling directly over the shoulders. Both positions start at 0 degrees of shoulder rotation. Which one do you think will cause impingement further away from the chest? Both arrows are the same exact size.
In combination, a wide grip and a sizeable arch allow a lifter to minimize the moment arm between the shoulder and the bar. If that wasn’t enough, this potent combination can also reduce your range of motion by ~6” depending on the size of your frame.
This is why we can have a 14 year old, 130lbs girl benching 255:
https://www.youtube.com/watch?v=Jgz61LwoRNQ
Touch Point in the Bench Press
So, let’s bring this all together. The shoulder joint represents the balance point, the fulcrum, in the lifter/barbell system during the bench press. While avoiding shoulder impingement, we want to touch as close to this joint as possible. In order to do this, we take as wide grip of a grip as we can manage without pain. We also use as big of an arch as possible.
Your personal touch point will be determined by a combination of all of the following factors: anthropometry (your segment lengths; arms, torso, etc.), the size of the arch you can produce, the width of the grip your shoulders can tolerate, and the highest point on your chest as a result of your arch.
Let’s address that last point. Sometimes, due to the way your body is constructed, it will be worth it to touch slightly further away from your shoulders in order to cut down on your range of motion. For example, some guys have bellies so large that, for them, touching the highest part of the abdominal wall allows them to cuts several inches off of the range of motion. Even though this increases the moment arm between the bar and the shoulder, they end up moving more weight due to the decreased range of motion and the improved leverage of their bottom position (joint angles when the bar touches).
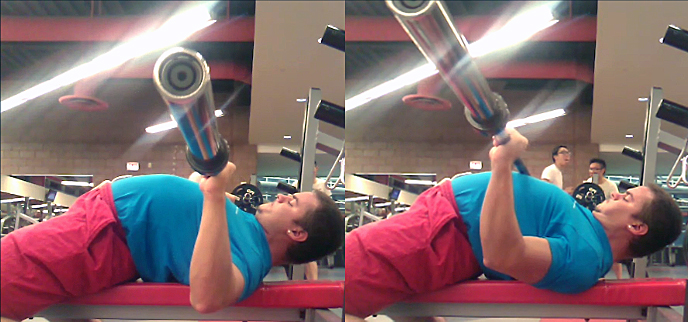 The ideal spot to touch is a compromise between the highest touch point (right) and the straightest bar path (left).
All in all, the bench press touch point takes quite a bit of personal experimentation, but always keep in mind that, as in all of the powerlifts, you’re looking to minimize both the moment arms involved and the range of motion. Sometimes, you need to make a compromise between the two. Within this very, very small band of bench technique, you will actually have to find “what works for you”.
Bench Press Bar Path
Now that we’ve established that benching in a straight line is impossible when we stay over the shoulder joint, we have to wonder what is the precise way that we should move the bar?
The sooner we can get the bar back over our shoulder joint, the better. This is the position of best leverage. When the bar is over the shoulder joint, there is zero moment force between the shoulder and the bar. So, instead of perhaps a backwards diagonal line, a proper bench press employs a “J” curve bar path.
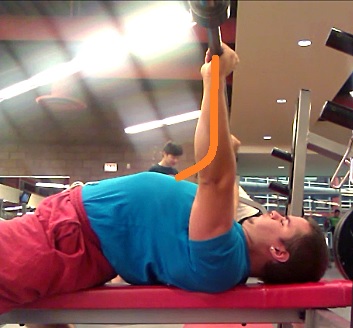 The proper bench press bar path.
The “J” curve allows us to most quickly get the bar back in line with our shoulder joint without causing any impingement. In terms of application in the weight room, this means your initial push is actually going to be up AND back. Once the bar finds the “groove”, right above the shoulder, you’ll be pushing straight up to lockout. That first part will be curved, though. And, overall, the bar path will resemble a “J”.
Moving Forward
In this bench press form analysis we’ve established that the best way to bench for the purposes of powerlifting, the way that both minimizes range of motion and the relevant leverage on the system, includes as wide of a grip as possible and as big of an arch as possible. It also includes a touch point that compromises between being as close to the shoulder joint as possible without causing impingement and touching the highest point of the lifter’s arched body.
I don’t care if I sound like a broken record: the principles used to create the optimized powerlifting bench press technique in this article were distilled from Mark Rippetoe’s Starting Strength
 . If you find yourself enjoying this type of analysis, you’ll love Starting Strength. Do yourself a favor and snag a copy of the book.
 .
.In the foundation article of this series, the concept of moment arms was introduced. The sum total length of all relevant moment arms on the lifter/barbell system equates to the amount of leverage the lifter must overcome to complete the lift. If you’re not aware of what a moment arm is, see Part I.
For lifters with “poor” leverages, 405lbs is not the same 405lbs that is for a lifter with “good” leverages. In fact, the strongest lifter doesn’t always win on a given lift. Sometimes, it is the lifter with the more advantageous body type. And, more importantly, sometimes it is the smarter lifter who knows how to manipulate the leverages of a given lift to his favor. Let’s analyze how we can do that in the bench press.
If you don’t mind missing out on a few of the finer details, the following video summarizes this article well:
https://www.youtube.com/watch?v=GvTzrvtos5I
Balance and The Shoulder Joint
In the squat, the mid-foot is the balance point of the system. Any time you bring the center of mass (CoM) of a system out of line with its balance point, you create an unnecessary moment arm. In much the same way that it requires greater effort to stay afoot when you’re leaning backwards, it takes greater effort to move a weight when it is being moved out of balance.

In the bench press, the shoulder joint is this point of balance; the shoulder joint represents the fulcrum of the system. Consider a wrench once more. The bolt is the fulcrum and the wrench handle is the moment arm. And the shorter the handle the less effective the wrench will be. Because our shoulder is that “bolt”, we want to minimize any moment arms in order to improve our leverages.

Benching in a Straight Line
Wait a minute; am I essentially advocating a straight line bench? In a perfect world, a straight line bench would be the most mechanically efficient way to press. However, due to the anatomical construction of the vast majority of shoulders, this is impossible.
You see, shoulder joints tend to “impinge” when the elbows travel in a line parallel to the bar. When you reach somewhere around 90 degrees, the bony parts of the shoulder run into rotator cuff. Over time, you can literally saw a hole into your rotator cuffs by benching with your elbows completely flared. This is why the bench press has a reputation for being a shoulder destroyer. Performed incorrectly, the movement can and will cause impingement which, over time, will lead to shoulder degradation.
 Photograph: orthosports.com
If our career in the sport is to be a long one, and it should be in order to give us the necessary time to maximize our genetic potential, we must preserve the health of our shoulders. This requires benching with a non-vertical bar path. Avoiding Shoulder Impingement in the Bench Press
So, this raises the question. Exactly where should the bar touch on the chest in a bench press designed for optimal powerlifting performance? The answer is remarkably similar to our answer for squat stance width.
As you might expect, there are several common genetic variations when it comes to the shoulder joint. For some, impingement will occur with less shoulder rotation than others. Unfortunately, there is no way to prescribe a specific touch point except on a case by case basis. First and foremost, you must protect your shoulders. In order to do this, you’ll have to experiment to see what you can personally get away with. The closer to the joint, the more mechanically efficient you will be.
 This is your shoulder joint.
This said, there are some ways that everyone can “move” their ideal touch point closer to the shoulder joint itself.
Bench Press Grip Width
Remember, impingement is going to happen at a particular degree of shoulder rotation given a certain amount of shoulder abduction (shoulder abduction is the degree to which the elbows are flared; 90 degrees being completely parallel to the bar). By taking a wider grip, we can decrease the amount of distance the bar has to travel in order to achieve full range of motion.

Look at the yellow arrows pointing to the catches on each upright. The wide grip bench (right) clearly cuts off 2-3″ of RoM compared to the narrower grip.
A wider grip also allows us to get closer to the shoulder before impingement starts to occur. Because the range of motion has been shortened, you’re getting “deeper” with the bar for the same amount of shoulder rotation. What this means in practical terms is that you don’t have to touch as far down your chest as you normally might with a closer grip.
However, I must make a cautionary note. Grip width itself will present shoulder problems for some anatomical variations of the shoulder joint. In this case, the same principles still apply, but the exact grip width must be moderated. Essentially, use the widest grip you can tolerate without pain. In the context of your circumstances, this will still result in the shortest range of motion possible and the touch point that is closest to your shoulder joint.
In sum, the wider grip both significantly decreases the range of motion and shortens the lever arm between the shoulder and the bar. Both of these factors will allow for more weight to be lifted even absent a gain in strength.
The Bench Press Arch
Developing a good arch in your back is one of the most critical components to perfecting your bench press technique.
 Notice the elbow height relative to the bench pad. When you arch (left), you cut the range of motion another several inches.
First, let’s address the obvious. The arch significantly decreases the range of motion of the movement. In much the same way that you will always quarter squat more than you can squat to depth, you’ll always bench more with an arch versus what you can bench without an arch.
However, the arch also allows for a closer touch point to the shoulder for exactly the same reason that the wider grip does: less range of motion means less degrees of shoulder rotation at a given distance from the chest.

Shoulder impingement happens after a certain degree of shoulder rotation when the bar is traveling directly over the shoulders. Both positions start at 0 degrees of shoulder rotation. Which one do you think will cause impingement further away from the chest? Both arrows are the same exact size.
In combination, a wide grip and a sizeable arch allow a lifter to minimize the moment arm between the shoulder and the bar. If that wasn’t enough, this potent combination can also reduce your range of motion by ~6” depending on the size of your frame.

This is why we can have a 14 year old, 130lbs girl benching 255:
https://www.youtube.com/watch?v=Jgz61LwoRNQ
Touch Point in the Bench Press
So, let’s bring this all together. The shoulder joint represents the balance point, the fulcrum, in the lifter/barbell system during the bench press. While avoiding shoulder impingement, we want to touch as close to this joint as possible. In order to do this, we take as wide grip of a grip as we can manage without pain. We also use as big of an arch as possible.
Your personal touch point will be determined by a combination of all of the following factors: anthropometry (your segment lengths; arms, torso, etc.), the size of the arch you can produce, the width of the grip your shoulders can tolerate, and the highest point on your chest as a result of your arch.
Let’s address that last point. Sometimes, due to the way your body is constructed, it will be worth it to touch slightly further away from your shoulders in order to cut down on your range of motion. For example, some guys have bellies so large that, for them, touching the highest part of the abdominal wall allows them to cuts several inches off of the range of motion. Even though this increases the moment arm between the bar and the shoulder, they end up moving more weight due to the decreased range of motion and the improved leverage of their bottom position (joint angles when the bar touches).
 The ideal spot to touch is a compromise between the highest touch point (right) and the straightest bar path (left).
All in all, the bench press touch point takes quite a bit of personal experimentation, but always keep in mind that, as in all of the powerlifts, you’re looking to minimize both the moment arms involved and the range of motion. Sometimes, you need to make a compromise between the two. Within this very, very small band of bench technique, you will actually have to find “what works for you”.
Bench Press Bar Path
Now that we’ve established that benching in a straight line is impossible when we stay over the shoulder joint, we have to wonder what is the precise way that we should move the bar?
The sooner we can get the bar back over our shoulder joint, the better. This is the position of best leverage. When the bar is over the shoulder joint, there is zero moment force between the shoulder and the bar. So, instead of perhaps a backwards diagonal line, a proper bench press employs a “J” curve bar path.
 The proper bench press bar path.
The “J” curve allows us to most quickly get the bar back in line with our shoulder joint without causing any impingement. In terms of application in the weight room, this means your initial push is actually going to be up AND back. Once the bar finds the “groove”, right above the shoulder, you’ll be pushing straight up to lockout. That first part will be curved, though. And, overall, the bar path will resemble a “J”.
Moving Forward
In this bench press form analysis we’ve established that the best way to bench for the purposes of powerlifting, the way that both minimizes range of motion and the relevant leverage on the system, includes as wide of a grip as possible and as big of an arch as possible. It also includes a touch point that compromises between being as close to the shoulder joint as possible without causing impingement and touching the highest point of the lifter’s arched body.
