Cable Row Technique
The mid-back (and lats) make up a considerable amount of muscle mass in the body and training those muscles groups effectively should be a key part of any good training program. In terms of maintaining good shoulder health and posture, along with developing musculature that contributes significantly to overall mass; training the back properly is key. Unfortunately, many trainees either pay little attention to the back or train it so ineffectively as to make that training, well…ineffective.
Today I want to look at some common cable row variants noting that most of the comments I’m going to make can be equally applied to barbell or dumbbell rowing or even various rowing machines. So don’t get hung up on the fact that I took pictures of a cable using specific attachments, it’s the mechanics of the different movements that is the key.
Muscles Targeted
Cable rows can hit a variety of different muscles depending on the specific variant performed. Lats, mid-back (teres/rhomboids), traps, biceps, rear delts, and spinal erectors can all be hit in one fashion or another depending on the type of row done. Even the triceps long-head (which is involved in shoulder extension) gets some work from certain types of rows. Basically, as one of the ‘big’ compound movements, rows can work a lot of stuff in a very small amount of time.
Basic Technique

Cable Row Start

Cable Row Finish
In the next series of photos, I want to contrast a proper end position (above right) to what is typically seen in the gym. In the leftmost photo, I’ve reproduced a proper ending position. In the middle picture, I’ve shown what typically happens when either too much weight is being used and/or the trainees pecs and shoulders are too tight to allow for proper mechanics to be used.
Note that the chest is dropped, the shoulders don’t get pulled back and, frankly, the back isn’t being utilized very effectively. Individuals who use this type of form are usually the ones who complain that all they get out of back work is fatigue in their arms. That’s because they aren’t using their back muscles to any great degree. Folks who insist on putting way too much weight on the machine are the ones who report this.

Correct Cable Row Finish

Back Rounded at Finish
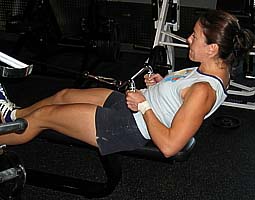
Another common flaw, again seen in folks using too much weight is to turn the movement into a back extension and lean too far back. Again, I’ve shown a proper finishing position (left) with an extreme improper position on the right.

Correct Cable Row Finish
Leaning Back at Finish
I’d note again that the cable row is sometimes used to do back extensions (and to train the hamstrings), typically by keeping the arms straight and doing almost an RDL type of movement (an exercise I’ll detail in an upcoming article). For the purposes of training the back, the above right picture is an incorrect finishing position.
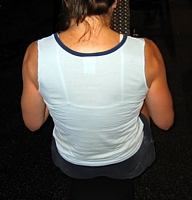
Moving around to behind the trainee, I want to show what it looks like from the back for the proper finish versus rounded shoulders position (shown two sets of pictures above). On the left, you can clearly see how the trainees shoulders are back and their shoulder blades are pulled together.
On the right, the shoulders don’t get pulled all the way back and the mid-back muscles aren’t getting trained effectively. The trainee on the right needs to drop the weight and make sure that they get their shoulders blades pulled together at the end of every rep.

Correct Finish: Back View
Rounded Back: Back View
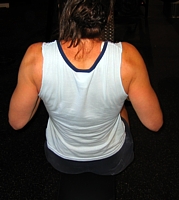
The next common error I want to show is a subtlety involving shoulder position. In the left picture below, the trainee (in addition to everything above) has scooped their shoulders down and back with the shoulders kept down at the end of the movement.
In the right picture (and this is a little tough to see; it’s usually more exaggerated than this) the shoulders are hiking up towards the ears. You can see the tension in the upper traps in the right picture compared to the left if you look closely.

Correct Finish: Back View
Shoulders Hiked: Back View
This tends to happen when the muscles which raise the shoulders (upper trapezius/levator scapulae/scalenes) are tight and the muscle which keep them down (lower traps primarily) are weak. Stretching the traps/levator between sets and actively trying to scoop the shoulders down and back not only helps correct this flaw but also helps to re-balance the muscles that keep the scapulae in place.
Exercise Variations
Having examined the basics of cable row form (which applies to all variants), I want to talk a little bit about how different grips/handles/pulling positions affect the musculature of the back. The main muscles I’m going to focus on are the midback (teres and rhomboids) along with the lats and biceps since those tend to be the muscles most drastically affected by changes in grip position and width.
I’d note that the traps (which is a complex muscle with 4 different segments pulling in different directions) can also be targeted differently depending on which variant is done. I’ll save trap training for another article so I can get into proper detail with it.
Done properly, all cable row work should hit the mid-back, assuming that the shoulder blades are pulled together properly at the end of the movement. The big differences tend to be how much the lats and biceps contribute.
I’d note that, in some people (with strong lats and a weak mid-back), lat dominant rowing can overpower the mid-back with the lats handling nearly all the work. In that case, picking a variant that takes the lats out of the movement may be a better option.
With the parallel grip handle (which was used in the basic technique demonstration), the biceps themselves don’t have a great line of pull although the brachialis muscle will be used heavily (like a hammer curl). Because the elbows are down by the side of the body, the lats (which contribute to shoulder extension) will contribute significantly to the movement along with the midback.
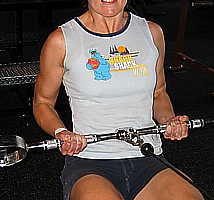
A similar pulling position is the narrow under-grip shown below from both the front and back You’ll note that the hands are about shoulder width and the forearms end up perpendicular to the bar (avoiding wrist stress). The bar also hits the body lower compared to the parallel grip handle, about belly button level.
Underhand Narrow Grip Finish

Underhand Narrow Grip Finish: Back
With the under-grip, the biceps can provide the most contribution compared to either parallel or overhand variants. As well, the mid-back and lats are also involved heavily. Frankly, if I wanted to or had to pick a single pulling movement to hit the most muscles at once, this would probably be it. You can hammer biceps, lats and mid-back in one movement.
This variant of the row also tends to be the safest movement for the shoulders since it tends to be the easiest to keep the shoulders down and requires the least amount of scapular/rotator cuff control to avoid problems. The key is to focus on scooping the shoulders down and back as you row.
At the other extreme is an overhand fairly wide grip pulled basically in line with the pecs. The gym we were at when we shot these pictures didn’t have a bar as long as I’d like and this grip is actually a bit narrower than I’d normally recommend; I like to see the forearms parallel to the handle (you can see how the wrists and forearms are angled in in the picture below).
This is shown from the front and back below, note that the bar also hits the body higher up (around sternum level). You can also use this pulling position with many parallel grip handles (not shown) instead of the overgrip but everything else is identical.
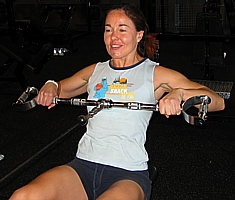
Overhand Medium Grip Finis
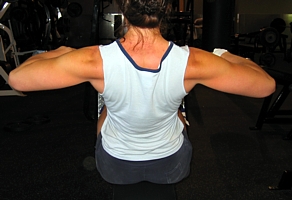
Overhand Medium Grip Finish: Back View
With this grip and pull position, the lats have a poor line of pull and don’t contribute nearly as much compared to parallel or underhand rowing; the majority of the stress is thrown onto the mid-back muscles (the rear delts are also worked very heavily).
This is a good movement when really want to hammer the mid-back without hitting much lat, but tends to require the most shoulder/rotator cuff control to keep the movement safe. It’s crucial to actively keep the shoulders down to avoid any problems with shoulder impingement. If your shoulders hike up as shown in the basic technique section, you can expect shoulder problems to follow.
Somewhere between those two extremes is a medium grip row; this can be done overhand or with a neutral grip (shown), pulled to slightly below the pec line. In this one the bar is a bit longer than I’d like and the forearms are pointed out instead of being parallel. Normally I’d use a standard lat pulldown bar and have the hands in a position such that the forearms were perpendicular to the bar at the end of the movement.

Wide Parallel Grip Finish
Of course, there are still other variants that can be done. Using a single cable crossover handle, any of the movements shown can be done one arm at a time; keep the elbow down and pull low to focus on lats or keep the elbow high and pull high to focus on mid-back.
As well, all of the above concepts apply equally to other forms of rowing such as barbell rows (which can be done undergrip pulling low to the belly or overgrip pulling to either the top of the stomach or the chest) as well as dumbbell rowing.
A 1-arm DB row can be done with the elbow tight to the body (as in the undergrip or narrow grip row) for more lat emphasis or with the elbow flared out (as in the wide grip row) for more mid-back. The same can even be done with body weight inverted rows (done hanging from a bar). A narrow undergrip pulling to the belly is the same as the narrow undergrip described above and hits more lats; wider grip with elbows flared is the same as the wide grip row and hits more mid-back. I think you get the idea.
Various machine rows also exist and usually offer at least two different pulling options. Generally, a handle pointing down (which keeps the elbow down, for lat emphasis) and a handle that is horizontal (keeping the elbow high for more midback) are offered, some machines have even more options than that.
As a final comment, one way I have long preferred to do rows is with a 1-2″ (or longer in some cases) isometric hold in back. Not only does this tend to force good form, it can also go a long way towards retraining the crucial postural muscles in the mid-back since more and more people are tending to adopt a rounded upper back hunched posture from sitting in front of the computer.
The key to making this effective is that the movement should end with the chest high, upper back slightly arched and shoulders pulled all the way back and held there through the length of the pause. This will generally necessitate a fairly large reduction in weight at least initially.
The mid-back (and lats) make up a considerable amount of muscle mass in the body and training those muscles groups effectively should be a key part of any good training program. In terms of maintaining good shoulder health and posture, along with developing musculature that contributes significantly to overall mass; training the back properly is key. Unfortunately, many trainees either pay little attention to the back or train it so ineffectively as to make that training, well…ineffective.
Today I want to look at some common cable row variants noting that most of the comments I’m going to make can be equally applied to barbell or dumbbell rowing or even various rowing machines. So don’t get hung up on the fact that I took pictures of a cable using specific attachments, it’s the mechanics of the different movements that is the key.
Muscles Targeted
Cable rows can hit a variety of different muscles depending on the specific variant performed. Lats, mid-back (teres/rhomboids), traps, biceps, rear delts, and spinal erectors can all be hit in one fashion or another depending on the type of row done. Even the triceps long-head (which is involved in shoulder extension) gets some work from certain types of rows. Basically, as one of the ‘big’ compound movements, rows can work a lot of stuff in a very small amount of time.
Basic Technique
First I want to show the basic starting and ending position for a parallel grip row. In the start picture (left) note that the torso is leaned only slightly forwards with the knees bent and the back held straight. I want to comment that some rowing variants include flexion (bending at either the upper or lower spine) so that, with extension, there is more dynamic work thrown onto the spinal erectors.
I didn’t take photos of that since I’m focusing here on the midback and lat muscles specifically. In the end position, note that the elbows are slightly behind the body, the shoulders are pulled back and the chest is lifted (with a slight arch in the upper back). This is key to getting a good contraction in the back. You’ll also note that, because of the elbow position, the handle hits the body in approximately the middle of the torso with the forearms perpendicular to the line of pull.

Cable Row Start

Cable Row Finish
In the next series of photos, I want to contrast a proper end position (above right) to what is typically seen in the gym. In the leftmost photo, I’ve reproduced a proper ending position. In the middle picture, I’ve shown what typically happens when either too much weight is being used and/or the trainees pecs and shoulders are too tight to allow for proper mechanics to be used.
Note that the chest is dropped, the shoulders don’t get pulled back and, frankly, the back isn’t being utilized very effectively. Individuals who use this type of form are usually the ones who complain that all they get out of back work is fatigue in their arms. That’s because they aren’t using their back muscles to any great degree. Folks who insist on putting way too much weight on the machine are the ones who report this.

Correct Cable Row Finish

Back Rounded at Finish
Another common flaw, again seen in folks using too much weight is to turn the movement into a back extension and lean too far back. Again, I’ve shown a proper finishing position (left) with an extreme improper position on the right.

Correct Cable Row Finish

Leaning Back at Finish
I’d note again that the cable row is sometimes used to do back extensions (and to train the hamstrings), typically by keeping the arms straight and doing almost an RDL type of movement (an exercise I’ll detail in an upcoming article). For the purposes of training the back, the above right picture is an incorrect finishing position.
Moving around to behind the trainee, I want to show what it looks like from the back for the proper finish versus rounded shoulders position (shown two sets of pictures above). On the left, you can clearly see how the trainees shoulders are back and their shoulder blades are pulled together.
On the right, the shoulders don’t get pulled all the way back and the mid-back muscles aren’t getting trained effectively. The trainee on the right needs to drop the weight and make sure that they get their shoulders blades pulled together at the end of every rep.

Correct Finish: Back View

Rounded Back: Back View
The next common error I want to show is a subtlety involving shoulder position. In the left picture below, the trainee (in addition to everything above) has scooped their shoulders down and back with the shoulders kept down at the end of the movement.
In the right picture (and this is a little tough to see; it’s usually more exaggerated than this) the shoulders are hiking up towards the ears. You can see the tension in the upper traps in the right picture compared to the left if you look closely.

Correct Finish: Back View

Shoulders Hiked: Back View
This tends to happen when the muscles which raise the shoulders (upper trapezius/levator scapulae/scalenes) are tight and the muscle which keep them down (lower traps primarily) are weak. Stretching the traps/levator between sets and actively trying to scoop the shoulders down and back not only helps correct this flaw but also helps to re-balance the muscles that keep the scapulae in place.
Exercise Variations
Having examined the basics of cable row form (which applies to all variants), I want to talk a little bit about how different grips/handles/pulling positions affect the musculature of the back. The main muscles I’m going to focus on are the midback (teres and rhomboids) along with the lats and biceps since those tend to be the muscles most drastically affected by changes in grip position and width.
I’d note that the traps (which is a complex muscle with 4 different segments pulling in different directions) can also be targeted differently depending on which variant is done. I’ll save trap training for another article so I can get into proper detail with it.
Done properly, all cable row work should hit the mid-back, assuming that the shoulder blades are pulled together properly at the end of the movement. The big differences tend to be how much the lats and biceps contribute.
I’d note that, in some people (with strong lats and a weak mid-back), lat dominant rowing can overpower the mid-back with the lats handling nearly all the work. In that case, picking a variant that takes the lats out of the movement may be a better option.
With the parallel grip handle (which was used in the basic technique demonstration), the biceps themselves don’t have a great line of pull although the brachialis muscle will be used heavily (like a hammer curl). Because the elbows are down by the side of the body, the lats (which contribute to shoulder extension) will contribute significantly to the movement along with the midback.
A similar pulling position is the narrow under-grip shown below from both the front and back You’ll note that the hands are about shoulder width and the forearms end up perpendicular to the bar (avoiding wrist stress). The bar also hits the body lower compared to the parallel grip handle, about belly button level.

Underhand Narrow Grip Finish

Underhand Narrow Grip Finish: Back
With the under-grip, the biceps can provide the most contribution compared to either parallel or overhand variants. As well, the mid-back and lats are also involved heavily. Frankly, if I wanted to or had to pick a single pulling movement to hit the most muscles at once, this would probably be it. You can hammer biceps, lats and mid-back in one movement.
This variant of the row also tends to be the safest movement for the shoulders since it tends to be the easiest to keep the shoulders down and requires the least amount of scapular/rotator cuff control to avoid problems. The key is to focus on scooping the shoulders down and back as you row.
At the other extreme is an overhand fairly wide grip pulled basically in line with the pecs. The gym we were at when we shot these pictures didn’t have a bar as long as I’d like and this grip is actually a bit narrower than I’d normally recommend; I like to see the forearms parallel to the handle (you can see how the wrists and forearms are angled in in the picture below).
This is shown from the front and back below, note that the bar also hits the body higher up (around sternum level). You can also use this pulling position with many parallel grip handles (not shown) instead of the overgrip but everything else is identical.

Overhand Medium Grip Finis

Overhand Medium Grip Finish: Back View
With this grip and pull position, the lats have a poor line of pull and don’t contribute nearly as much compared to parallel or underhand rowing; the majority of the stress is thrown onto the mid-back muscles (the rear delts are also worked very heavily).
This is a good movement when really want to hammer the mid-back without hitting much lat, but tends to require the most shoulder/rotator cuff control to keep the movement safe. It’s crucial to actively keep the shoulders down to avoid any problems with shoulder impingement. If your shoulders hike up as shown in the basic technique section, you can expect shoulder problems to follow.
Somewhere between those two extremes is a medium grip row; this can be done overhand or with a neutral grip (shown), pulled to slightly below the pec line. In this one the bar is a bit longer than I’d like and the forearms are pointed out instead of being parallel. Normally I’d use a standard lat pulldown bar and have the hands in a position such that the forearms were perpendicular to the bar at the end of the movement.

Wide Parallel Grip Finish
Of course, there are still other variants that can be done. Using a single cable crossover handle, any of the movements shown can be done one arm at a time; keep the elbow down and pull low to focus on lats or keep the elbow high and pull high to focus on mid-back.
As well, all of the above concepts apply equally to other forms of rowing such as barbell rows (which can be done undergrip pulling low to the belly or overgrip pulling to either the top of the stomach or the chest) as well as dumbbell rowing.
A 1-arm DB row can be done with the elbow tight to the body (as in the undergrip or narrow grip row) for more lat emphasis or with the elbow flared out (as in the wide grip row) for more mid-back. The same can even be done with body weight inverted rows (done hanging from a bar). A narrow undergrip pulling to the belly is the same as the narrow undergrip described above and hits more lats; wider grip with elbows flared is the same as the wide grip row and hits more mid-back. I think you get the idea.
Various machine rows also exist and usually offer at least two different pulling options. Generally, a handle pointing down (which keeps the elbow down, for lat emphasis) and a handle that is horizontal (keeping the elbow high for more midback) are offered, some machines have even more options than that.
As a final comment, one way I have long preferred to do rows is with a 1-2″ (or longer in some cases) isometric hold in back. Not only does this tend to force good form, it can also go a long way towards retraining the crucial postural muscles in the mid-back since more and more people are tending to adopt a rounded upper back hunched posture from sitting in front of the computer.
The key to making this effective is that the movement should end with the chest high, upper back slightly arched and shoulders pulled all the way back and held there through the length of the pause. This will generally necessitate a fairly large reduction in weight at least initially.

Comment